OAuth 2.0 is an industry-standard framework that allows different applications to securely interact with each other on behalf of users without sharing sensitive credentials. More about OAuth here.
At Celonis, we are in the process of moving away from long term API and Application keys and rapidly moving towards OAuth. This section highlights what Celonis APIs today already support OAuth and how you can migrate your applications that call these APIs using API/Application keys to OAuth.
| API Name | OAuth Scope |
|---|---|
| Audit Log API | audit.log:read |
| Platform Adoption API | platform-adoption.tracking-events:read |
| Team Login History API | team.login-history:read |
| Team Members API | team.user-group-info:read |
| Machine Learning Workbench API | machine-learning |
| Process Intelligence APIs (Knowledge Model API, EventSubscription API, Chat API) | intelligence.conversations:write, intelligence.knowledge-models:read, intelligence.subscriptions:manage |
| Data Job Execution API | integration.data-pools |
| Process Data Model API | integration.data-pools |
| SCIM API | user-provisioning.scim |
| Important Update: SCIM API is now supported with Microsoft EntraID and OAuth. | |
OAuth scopes restrict which APIs are accessible by OAuth clients, while Permissions give access to the individual resources offered by these APIs. For a detailed explanation of what access you get with each OAuth scope listed in the table above, refer to Registering your OAuth Client.
If you have any application in your Celonis environment using any of the above APIs, then we strongly recommend that you migrate your applications to OAuth 2.0 and move away from long term API/Application keys as Celonis is moving away from these long term keys in the future.
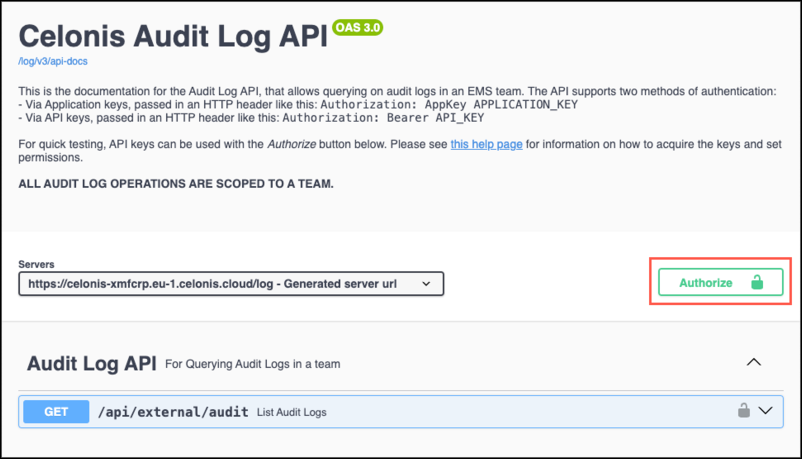
Given below is an example of how you can migrate to OAuth. In this example, we have used Audit log API, Team Login history API, Platform adoption API, and Member / User Group Info API to show you how you can migrate an application that was previously calling these APIs using an application key to now calling the same APIs using OAuth 2.0.
Within Admin & Settings you can view your audit log, team login history, and studio adoption statistics. However, these views are limited with standardized user interfaces. To run a more in-depth analysis of this data, you can connect to their respective APIs and then use a data extractor to feed this information back into the Celonis Platform. This then lets you create your own views in Studio.
To connect to the APIs and create an extractor, refer to the Connecting audit log, login history, and Studio adoption APIs to Celonis Platform topic.
There are multiple ways to test Oauth credentials in Celonis:
The created OAuth credentials can be best tested in Postman or via the command line tool curl (it is installed in most workstations or can be found in the machine learning workbench in Celonis).
Follow the steps outlined in Requesting OAuth access tokens while using the required scopes.
When the credentials are set up correctly you should receive a scope similar to:
    {
        "access_token": "randomizedAccessToken",
        "scope": "scope 1 scope 2 scopeN",
        "token_type": "Bearer",
        "expires_in": 899
}You can now test your APIs with Swagger UI. To do this, you need your team name and environment cluster and your OAuth client from the earlier procedure. You can find your team name and environment cluster from any URL, for example from the Permissions page from the procedure above.
https://[teamname].[realm].celonis.cloud/ui/team/permissionsWith your team name and environment cluster, you can then access the Swagger UI using this URL:
https://[teamname].[realm].celonis.cloud/swagger-ui/index.html?configUrl=/log/v3/api-docs/swagger-configOnce on the Swagger UI, follow these steps to test your API:
Click Authorize.
When using an OAuth client (Recommended), enter "Bearer" followed by a space and then copy the client ID you obtained for the client. For example:
Bearer XxxxxxAxxxxBxxxxCxxxXBBBBXClick Authorize. Once the authorization is successful, click Close .
Expand the GET call for the API you want to test and click Try it out.
Click Execute.

You will now see the response from the API, including the header that shows the Token and the URL.
Go to the Data Pool where your Data Connection to the Celonis API lies and click on the menu of the data connection.
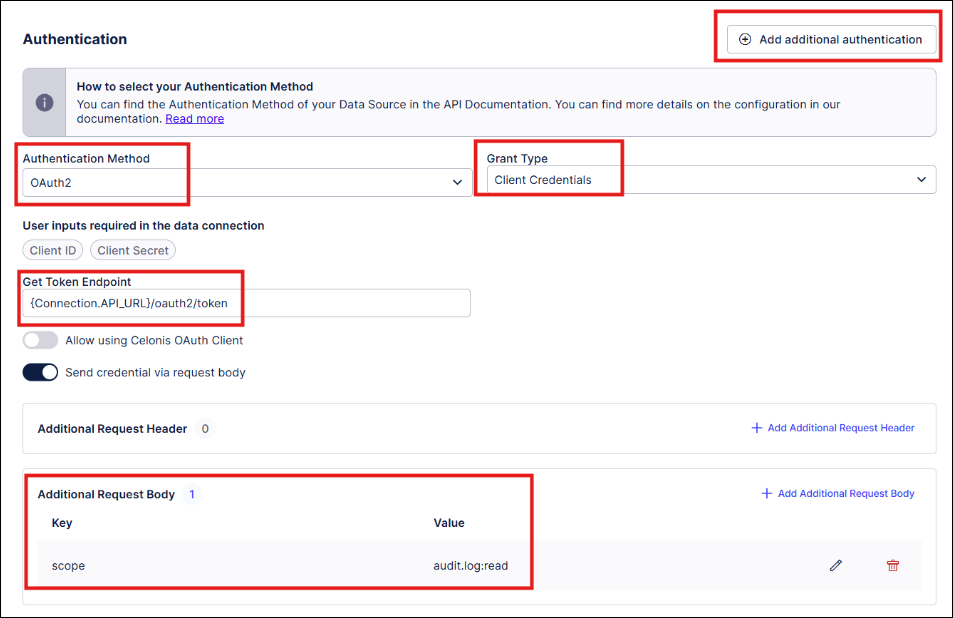
- Go to Authorization, add additional authentication and select "OAuth2".
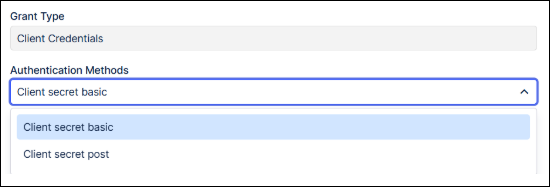
- Select “Client Credentials” as the Grant type.
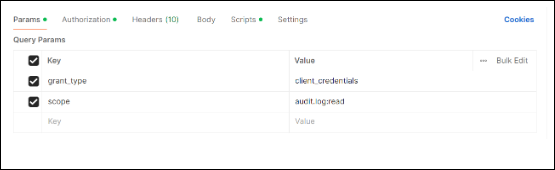
- Add an additional Request Body parameter with the key “scope” and the value for the scopes relevant for the Celonis APIs (separated by blank space, example shows the scope
audit.log:read)
The "scope" parameter must be added for OAuth. This parameter must be added in the "Additional request parameter" section, NOT in the "Additional Request Header" field.
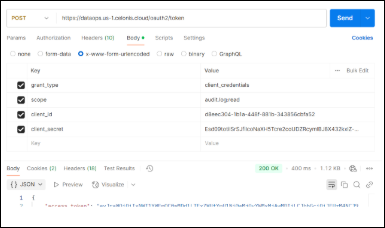
- Get bearer Token with the Endpoint to /oauth2/token.
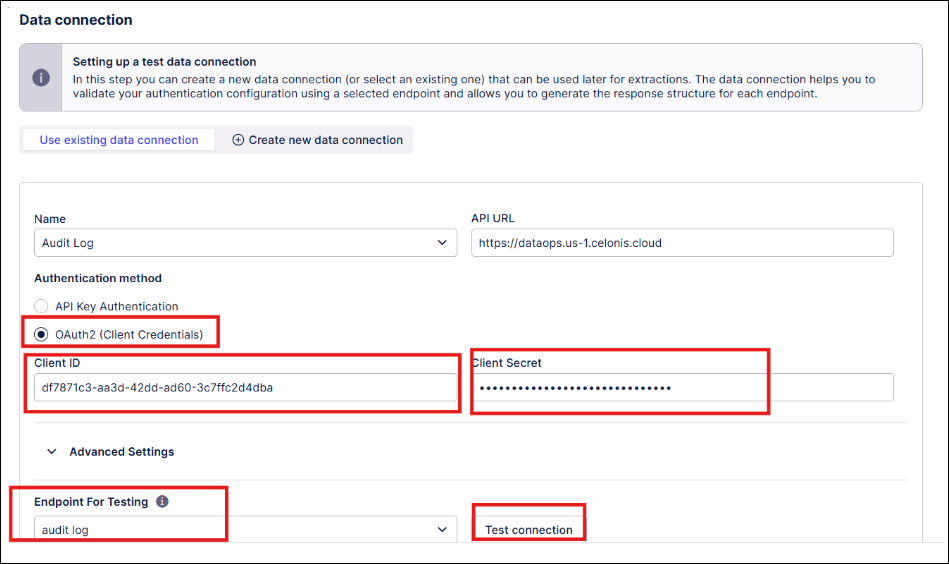
Go to Data Connection Test:
Enter the Client ID and Client Secret.
Select the End point that you have also chosen for AppKey "authentication3".
- Define Endpoints: Configure a new endpoint and enter an endpoint name.
- Endpoint Configure Request: In URL enter {Connection.API_URL}/ [Enter what is shown in the Swagger doc URL after celonis.com.cloud]. So the final text could read:
{Connection.API_URL}/log/api/external/audit?Request parameters and Headers can be completed after as needed).{Connection.API_URL}/log/api/external/audit?
Click Save.
Click Build Response.
Click Test Connection.
Click Finish.
See the Troubleshooting section below to resolve any errors.
When the connection test was successful, save the connection. To run the extraction test, go to the data job and manually execute an extraction (e.g., delta extraction).
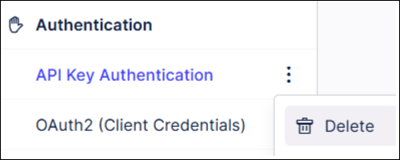
When the extraction was successful, you can go back to the customization of the extractor builder and delete API Key Authentication.
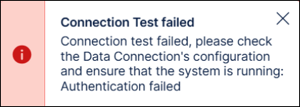
The most common errors during authentication and how to fix them.
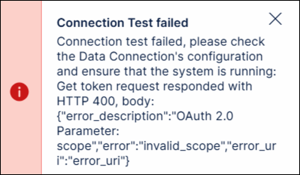
Wrong / missing scope
Postman
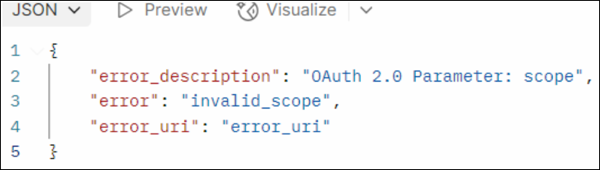
Extractor Builder
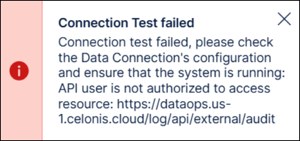
Missing permission / 401 unauthorized
Postman

Extractor Builder
Incorrect client ID / secret
Postman
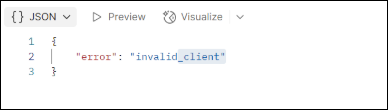
Extractor Builder
To send as params / request body
While creating Application based on the choice
Postman
If Client basic, send as request params
If Client Post, send as request body
If you are not familiar with how to create an extractor for Celonis APIs or how to create an extraction, refer to the sections below.
After testing your APIs, you now need to create an extractor. This extractor pulls detailed information from your team (via the API), allowing you to add this to your Studio views.
The extractor you create in the following steps is without both pagination and headers:
From your team, click Data - Data Integration.
Click New Data Pool > Create from scratch, add a name, and then click Save.
From the data integration diagram, click Connect to Data Source and then select Connect to Data Source.
Click Custom and then click the plus icon. Here you have three options:
Build a new Extractor
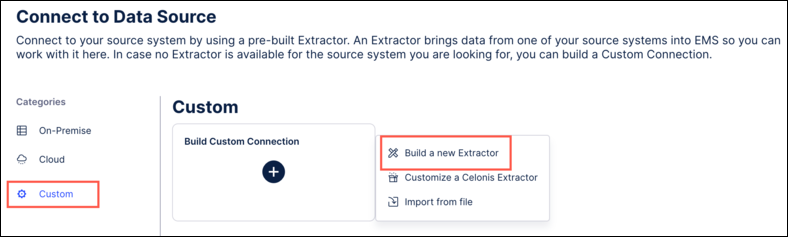
Customize a Celonis extractor
Import from File (For Audit logs with pagination, use this JSON template, this template can also act as the foundation for the Login Log API and the Adoption API).
When building a new extractor using the four stage wizard, enter the following information:
- Extractor name: This can be custom to your extractor.
- Connection Parameters - Edit API URL: Enter your Celonis team URL in the following format - https:// [Your Team].celonis.cloud
Once your extractor is built, you can configure delta loads by following these steps:
- Click Add Extraction.
- Click on the Parameters tab.
- Click New Parameters and populate and save the parameters as follows:
- Placeholder: LastUpdated
- Name: Last Updated
- Type: Dynamic
- Table: AuthenticationEvents
- Column: timestamp
- Default value: 01/01/2000, 00:00:00
- Click on the Tab configuration tab, scroll to Delta Filter Statement and add the following:
= from = < %=LastUpdated%> - Now add a data model, a data model load and a schedule following the user interface.